#chmod file permissions
Explore tagged Tumblr posts
Visit Tumblr Blog
Explore Tumblr blogs with no restrictions, modern design and the best experience.
Last Seen Tumblr Blogs


Fun Fact
Celebrities use Tumblr as well.
Text
How to change Permission file and folder in the Linux?
Introduction
Linux is renowned for its robust security features and the level of control it offers to users over their system. One fundamental aspect of this control is the ability to manage permissions for files and folders. Properly understanding and utilizing Linux file and folder permissions is crucial for maintaining the integrity of your system and ensuring that sensitive data remains protected. In this comprehensive guide, we will walk you through the process of changing permissions for files and folders in Linux, step by step.
The Linux operating system uses access permission to maintain security on files directories. When we create a file or directory, Linux assigns default permissions to them. In this tutorial, we’ll discuss different ways of changing permissions for directories and files within the directory. Privacy is an essential part of someone’s life, whether social media or the workplace. Read More
#How to change Permission file and folder in the Linux?#How to change directory permissions in Linux with chmod?#How to Change File Permissions
0 notes
Text
Congratulations, you know more programming than 90% of the people I talk to. That's usually enough to make most people completely check out
On one hand it would be so cool to be good at computers like almost all of you, on the other there is this autism part of me that does not want to learn about it, feels good about being incompetent at it, and does not want to find anything that others like cool or give others the satisfaction of being right.
And it does not even matter cause I can't afford one anyway lol.
#common file manipulation commands in Linux include:#ls - list the files within a directory#mv - move a file from one location to another#cp - create a copy of a file in one location at a different location#rm - remove a file#chmod - change a file's permissions#chown - change a file's owner
16 notes
·
View notes
Text

SYSTEM ADMIN INTERVIEW QUESTIONS 24-25
Table of Content
Introduction
File Permissions
User and Group Management:
Cron Jobs
System Performance Monitoring
Package Management (Red Hat)
Conclusion
Introduction
The IT field is vast, and Linux is an important player, especially in cloud computing. This blog is written under the guidance of industry experts to help all tech and non-tech background individuals secure interviews for roles in the IT domain related to Red Hat Linux.
File Permissions
Briefly explain how Linux file permissions work, and how you would change the permissions of a file using chmod. In Linux, each file and directory has three types of permissions: read (r), write (w), and execute (x) for three categories of users: owner, group, and others. Example: You will use chmod 744 filename, where the digits represent the permission in octal (7 = rwx, 4 = r–, etc.) to give full permission to the owner and read-only permission to groups and others.
What is the purpose of the umask command? How is it helpful to control default file permissions?umask sets the default permissions for newly created files and directories by subtracting from the full permissions (777 for directories and 666 for files). Example: If you set the umask to 022, new files will have permissions of 644 (rw-r–r–), and directories will have 755 (rwxr-xr-x).
User and Group Management:
Name the command that adds a new user in Linux and the command responsible for adding a user to a group. The Linux useradd command creates a new user, while the usermod command adds a user to a specific group. Example: Create a user called Jenny by sudo useradd jenny and add him to the developer’s group by sudo usermod—aG developers jenny, where the—aG option adds users to more groups without removing them from other groups.
How do you view the groups that a user belongs to in Linux?
The group command in Linux helps to identify the group a user belongs to and is followed by the username. Example: To check user John’s group: groups john
Cron Jobs
What do you mean by cron jobs, and how is it scheduled to run a script every day at 2 AM?
A cron job is defined in a crontab file. Cron is a Linux utility to schedule tasks to run automatically at specified times. Example: To schedule a script ( /home/user/backup.sh ) to run daily at 2 AM: 0 2 * * * /home/user/backup.sh Where 0 means the minimum hour is 2, every day, every month, every day of the week.
How would you prevent cron job emails from being sent every time the job runs?
By default, cron sends an email with the output of the job. You can prevent this by redirecting the output to /dev/null. Example: To run a script daily at 2 AM and discard its output: 0 2 * * * /home/user/backup.sh > /dev/null 2>&1
System Performance Monitoring
How can you monitor system performance in Linux? Name some tools with their uses.
Some of the tools to monitor the performance are: Top: Live view of system processes and usage of resource htop: More user-friendly when compared to the top with an interactive interface. vmstat: Displays information about processes, memory, paging, block IO, and CPU usage. iostat: Showcases Central Processing Unit (CPU) and I/O statistics for devices and partitions. Example: You can use the top command ( top ) to identify processes consuming too much CPU or memory.
In Linux, how would you check the usage of disk space?
The df command checks disk space usage, and Du is responsible for checking the size of the directory/file. Example: To check overall disk space usage: df -h The -h option depicts the size in a human-readable format like GB, MB, etc.
Package Management (Red Hat)
How do you install, update, or remove packages in Red Hat-based Linux distributions by yum command?
In Red Hat and CentOS systems, the yum package manager is used to install, update, or remove software. Install a package: sudo yum install httpd This installs the Apache web server. Update a package: sudo yum update httpd Remove a package:sudo yum remove httpd
By which command will you check the installation of a package on a Red Hat system?
The yum list installed command is required to check whether the package is installed. Example: To check if httpd (Apache) is installed: yum list installed httpd
Conclusion
The questions are designed by our experienced corporate faculty which will help you to prepare well for various positions that require Linux such as System Admin.
Contact for Course Details – 8447712333
2 notes
·
View notes
Text
Not quite exe
A time ago I talked about using Wine to play Windows games in Linux and Mac. I've thought that having to constantly type on the terminal can get tiring after a while, so I have a tutorial of how to make things easier for you future self:
Open a text editor a create a file whose content is the command you would input.
In the terminal, give everyone execution permission like this: chmod 777 FileName. For example: chmod 777 EXECUTE_ON_LINUX_OR_MAC.sh
When you try to execute it, choose execute on terminal and it will work like if you had input the command.
2 notes
·
View notes
Text
listen. listen what if i study for my exams by turning all the concepts i need to learn into characters and plots.
what if i talk about a cat made up of words. it likes eating them too, and will happily go and thieve away whatever book or document you've set aside and just eat it all. it'll give some back to you, though! you know, if you know the right command and you know what to look for.
its name is Chmod, and hanging from its collar are three tokens with numbers on it and if you grab the right token you could change the words written on its body and own it.
it leaves footprints made of words behind when it jogs, but not for long. they fade away in seconds, sent away to a mythical place called Varlog, where you can only enter if you have the right key.
anyway, this is my attempt to link together all the file manipulation commands for my exam, featuring:
cat (lets you view entire file)
head & tail (look, it's a cat, of course it has a head and tail, and each of them have 10 words each)
grep (the command you need to get words from the cat)
chmod (the name of the cat, and also the command you need to change file permissions)
logger (the command to add messages to var/log/syslog and look, i figured jogging was close enough, okay)
10 notes
·
View notes
Text
Essential Linux Commands: Mastering the Basics of Command-Line Operations
Linux, a powerful and versatile operating system, offers a command-line interface that empowers users with unprecedented control over their systems. While the graphical user interface (GUI) provides ease of use, understanding the fundamental Linux commands is essential for anyone seeking to harness the full potential of this open-source platform. In this article, we will explore some of the…
Essential Linux Commands help users navigate, manage files, and control system processes. Here are some key ones:
ls – List directory contents
cd – Change directory
pwd – Show current directory path
mkdir – Create a new directory
rm – Remove files or directories
cp – Copy files or directories
mv – Move or rename files
cat – View file contents
grep – Search text in files
chmod – Change file permissions
top – Monitor system processes
ps – Display running processes
kill – Terminate a process
sudo – Execute commands as a superuser
Mastering these commands boosts productivity and system control!
#Basics of Command-Line Operations#Command-Line Operations#Essential Linux Commands#Linux Commands#linux commands#linux#basic linux commands#linux command line#linux commands for beginners#linux basic commands#linux command line tutorial#learn linux#linux tutorial#linux commands tutorial#command line#commands in linux#best linux commands#linux for beginners#essential linux commands#linux tutorial for beginners#top linux terminal commands#basic linux ubuntu commands#linux commands with examples#commands#linux course
2 notes
·
View notes
Text
Exec Format Error: Why It Happens and How to Resolve It
An "exec format error" is a runtime issue that occurs when your system attempts to execute a file that's not compatible with its current architecture or lacks the proper execution metadata. It's most often seen when trying to run a binary built for a different platform—like running an x86_64 binary on an ARM device.
This error can also be triggered by scripts that don’t start with a valid shebang (e.g., #!/bin/bash or #!/usr/bin/env python3). Without it, the OS doesn't know which interpreter to use and fails to execute the script.
To fix it, start by checking the file with file filename to determine its type and target architecture. Then compare it with your system's architecture using uname -m. For scripts, make sure the shebang is correct and the file has execute permissions (chmod +x). If the binary is for a different architecture, you'll need to compile it for your current system or run it using a compatible container or emulator like QEMU.
0 notes
Text
What Steps Should I Take for OpenEMR Installation Issues?
Introduction
The installation process of OpenEMR presents difficulties due to its power as an open-source Electronic Medical Records (EMR) system. The following section presents known OpenEMR installation issues with corresponding step-by-step solutions.
Common Installation Errors and Solutions
1.PHP Compatibility Issues
Error: OpenEMR installation fails due to compatibility issues with PHP version.
Solution: The installation process requires using PHP version 7.4 or newer versions. The php.ini file requires PHP configuration updates that match OpenEMR settings. Proper error prevention involves enabling Off for short_open_tag while setting the memory_limit to 512M in your php.ini file.
2.Database Connection Failure
Error: “Cannot connect to the MySQL database.”
Cause: This error arises when the OpenEMR installer cannot establish a connection to the MySQL database.
Solution:
· Ensure the MySQL service is running: sudo service mysql start.
· Verify that the credentials in the sqlconf.php file are correct:
Php: $host = 'localhost'; $port = '3306'; $login = 'your_username'; $pass = 'your_password'; $dbase = 'openemr';
3. Blank Page After Installation
Error: A blank screen is displayed after installing OpenEMR.
Cause: Typically caused by a missing PHP module or a permissions issue.
Solution:
· Check for missing PHP modules using php -m | grep -i <missing_module>.
· Install missing modules with sudo apt-get install php-<module_name>.
· Ensure correct file permissions: sudo chmod -R 755 /var/www/openemr.
4. Locale Errors
Error: “PHP Warning: Failed to setlocale…”
Cause: The locale settings on the server are not configured correctly.
Solution:
· Install the appropriate locales: sudo locale-gen en_US.UTF-8.
· Reconfigure locales: sudo dpkg-reconfigure locales.
5. SQL Error in OpenEMR Usage
Error: A fatal error occurred that showed “Uncaught Error: SQLSTATE[42S02]: Base table or view not found…”
Cause: The missing database table or improper database table creation process causes this error to appear.
Solution:
· Re-execute the SQL upgrade script through the command: mysql -u root -p openemr < sql/upgrade.sql.
· All database tables need to be imported correctly.
6. PDF Generation Failure
Error: The error message reads, “FPDF error: Unable to create output file.”
Cause: The file system write permissions create a cause that prevents OpenEMR from generating output files.
Solution:
· Users need write permissions in the sites/default/documents directory because of this command: sudo chmod -R777/var/www/openemr/sites/default/documents.
Common Mistakes During Setup
1.Inadequate System Requirements Assessment
· Performance problems emerge because organizations underestimate their hardware requirements along with their software needs.
· System requirements assessment needs to become a complete process done before any installation begins.
2.Neglecting Data Backup and Recovery Planning
· Failing to plan backup procedures and recovery strategies remains one of the main setup challenges.
· Planning for data backup becomes essential since the absence of planning may cause complete loss of information.
· Regular backups should be conducted either through OpenEMR’s tools or third-party scripting solutions.
3.Improper Configuration
· Incorrectly implemented settings result in both performance issues and system errors.
· Users should verify that both database and PHP settings align correctly with OpenEMR’s necessary requirements.
Real-World Examples and Case Studies
Cloud Success Story: Through OpenEMR Cloud on AWS, this Vermont clinic cut their server maintenance expenses by 70% and also gained better peak-season system capabilities.
On-Premises Example: A large Texas hospital chose on-premises deployment of OpenEMR to sustain whole authority over security standards while maintaining easy integration with current hospital information infrastructure.
Troubleshooting Tips for Windows Installation
· Check PHP settings because you must enable all required PHP extensions while following the correct settings in the php.ini configuration file.
· Check MySQL Connection by verifying the correct running of MySQL and sqlconf.php credentials.
· During installation, use a temporary disable of antivirus software to prevent interruptions.
· You should check OpenEMR directory permissions to stop unauthorized access to its files.
Future Trends in OpenEMR
OpenEMR will continue integrating modern features into its system as healthcare technology advances forward.
AI and Machine Learning
· OpenEMR will incorporate artificial intelligence-based clinical decision support systems and predictive analytics technology for patient care in future updates.
Telehealth Enhancements
· The telehealth system will receive updated modules that enable remote consultation access while offering better healthcare access to patients.
Interoperability Standards
· Additional FHIR technology support in the system will help different healthcare systems communicate their data more efficiently.
Conclusion
The resolution of OpenEMR installation problems requires a careful approach together with expertise in frequent installation barriers. Healthcare providers who focus on PHP compatibility along with database connections and permissions will establish a successful OpenEMR setup while maximizing its functionality. Continuous updates about the latest OpenEMR advancements enable healthcare professionals to achieve maximum performance and efficiency for their management tasks.
FAQs
What are the most common installation errors in OpenEMR?
During OpenEMR installation, you might encounter three major issues that include PHP version conflicts as well as database connection problems and unexplained blank pages showing up because of either missing components or access permission problems.
How do I troubleshoot a blank page error after OpenEMR installation?
Review both PHP module's presence and verify correct permissions for the OpenEMR directory files.
What are some common mistakes during OpenEMR setup?
The integration of insufficient system assessment with poor data backup and recovery planning along with unsuitable configuration represents the main mistakes that cause performance degradation and data loss.
0 notes
Text
Unix Commands Every iOS Developer Should Know
When developing iOS applications, many developers focus primarily on Swift, Objective-C, and Xcode. However, a lesser-known yet powerful toolset that enhances productivity is Unix commands. Since macOS is a Unix-based operating system, understanding essential Unix commands can help iOS developers manage files, automate tasks, debug issues, and optimize workflows.
In this article, we’ll explore some of the most useful Unix commands every iOS developer should know.
Why Should iOS Developers Learn Unix?
Apple’s macOS is built on a Unix foundation, meaning that many system-level tasks can be efficiently handled using the terminal. Whether it’s managing files, running scripts, or automating processes, Unix commands can significantly enhance an iOS developer’s workflow. Some benefits include:
Better control over project files using the command line
Efficient debugging and log analysis
Automating repetitive tasks through scripting
Faster project setup and dependency management
Now, let’s dive into the must-know Unix commands for iOS development.
1. Navigating the File System
cd – Change Directory
The cd command allows developers to navigate between directories
{cd ~/Documents/MyiOSProject}
This moves you into the MyiOSProject folder inside Documents.
ls – List Directory Contents
To view files and folders in the current directory:
bash
CopyEdit
ls
To display detailed information, use:
bash
CopyEdit
ls -la
pwd – Print Working Directory
If you ever need to check your current directory:
bash
CopyEdit
pwd
2. Managing Files and Directories
mkdir – Create a New Directory
To create a new folder inside your project:
bash
CopyEdit
mkdir Assets
rm – Remove Files or Directories
To delete a file:
bash
CopyEdit
rm old_file.txt
To delete a folder and its contents:
bash
CopyEdit
rm -rf OldProject
⚠ Warning: The -rf flag permanently deletes files without confirmation.
cp – Copy Files or Directories
To copy a file from one location to another:
bash
CopyEdit
cp file.txt Backup/
To copy an entire folder:
bash
CopyEdit
cp -r Assets Assets_Backup
mv – Move or Rename Files
Rename a file:
bash
CopyEdit
mv old_name.txt new_name.txt
Move a file to another directory:
bash
CopyEdit
mv file.txt Documents/
3. Viewing and Editing Files
cat – Display File Contents
To quickly view a file’s content:
bash
CopyEdit
cat README.md
nano – Edit Files in Terminal
To open a file for editing:
bash
CopyEdit
nano config.json
Use Ctrl + X to exit and save changes.
grep – Search for Text in Files
To search for a specific word inside files:
bash
CopyEdit
grep "error" logs.txt
To search recursively in all files within a directory:
bash
CopyEdit
grep -r "TODO" .
4. Process and System Management
ps – Check Running Processes
To view running processes:
bash
CopyEdit
ps aux
kill – Terminate a Process
To kill a specific process, find its Process ID (PID) and use:
bash
CopyEdit
kill PID
For example, if Xcode is unresponsive, find its PID using:
bash
CopyEdit
ps aux | grep Xcode kill 1234 # Replace 1234 with the actual PID
top – Monitor System Performance
To check CPU and memory usage:
bash
CopyEdit
top
5. Automating Tasks with Unix Commands
chmod – Modify File Permissions
If a script isn’t executable, change its permissions:
bash
CopyEdit
chmod +x script.sh
crontab – Schedule Automated Tasks
To schedule a script to run every day at midnight:
bash
CopyEdit
crontab -e
Then add:
bash
CopyEdit
0 0 * * * /path/to/script.sh
find – Search for Files
To locate a file inside a project directory:
bash
CopyEdit
find . -name "Main.swift"
6. Git and Version Control with Unix Commands
Most iOS projects use Git for version control. Here are some useful Git commands:
Initialize a Git Repository
bash
CopyEdit
git init
Clone a Repository
bash
CopyEdit
git clone https://github.com/user/repo.git
Check Status and Commit Changes
bash
CopyEdit
git status git add . git commit -m "Initial commit"
Push Changes to a Repository
bash
CopyEdit
git push origin main
Final Thoughts
Mastering Unix commands can greatly improve an iOS developer’s efficiency, allowing them to navigate projects faster, automate tasks, and debug applications effectively. Whether you’re managing files, monitoring system performance, or using Git, the command line is an essential tool for every iOS developer.
If you're looking to hire iOS developers with deep technical expertise, partnering with an experienced iOS app development company can streamline your project and ensure high-quality development.
Want expert iOS development services? Hire iOS Developers today and build next-level apps!
#ios app developers#Innvonixios app development company#ios app development#hire ios developer#iphone app development#iphone application development
0 notes
Text
Linux Zero to Hero: Mastering the Open-Source Operating System
Linux, an open-source operating system, is the backbone of countless systems, from personal computers to enterprise servers and supercomputers. It has earned its reputation as a robust, versatile, and secure platform for developers, administrators, and tech enthusiasts. In this comprehensive guide, we explore the journey from being a Linux beginner to mastering its vast ecosystem.
Why Learn Linux?
1. Open-Source Freedom
Linux provides unparalleled flexibility, allowing users to customize and modify the system according to their needs. With its open-source nature, you have access to thousands of applications and tools free of charge.
2. Industry Relevance
Major companies, including Google, Amazon, and Facebook, rely on Linux for their servers and infrastructure. Learning Linux opens doors to lucrative career opportunities in IT and software development.
3. Secure and Reliable
Linux boasts a strong security model and is known for its stability. Its resistance to malware and viruses makes it the operating system of choice for critical applications.
Getting Started with Linux
Step 1: Understanding Linux Distributions
Linux comes in various distributions, each catering to specific needs. Popular distributions include:
Ubuntu: User-friendly, ideal for beginners.
Fedora: Known for cutting-edge technology and innovation.
Debian: Stable and versatile, preferred for servers.
CentOS: Enterprise-grade, often used in businesses.
Choosing the right distribution depends on your goals, whether it’s desktop use, development, or server management.
Step 2: Setting Up Your Linux Environment
You can use Linux in several ways:
Dual Boot: Install Linux alongside Windows or macOS.
Virtual Machines: Run Linux within your current OS using tools like VirtualBox.
Live USB: Try Linux without installation by booting from a USB drive.
Mastering Linux Basics
1. The Linux File System
Linux organizes data using a hierarchical file system. Key directories include:
/root: Home directory for the root user.
/etc: Configuration files for the system.
/home: User-specific data.
/var: Variable files, such as logs and databases.
2. Essential Linux Commands
Understanding basic commands is crucial for navigating and managing the Linux system. Examples include:
ls: Lists files and directories.
cd: Changes directories.
mkdir: Creates new directories.
rm: Deletes files or directories.
chmod: Changes file permissions.
3. User and Permission Management
Linux enforces strict user permissions to enhance security. The system categorizes users into three groups:
Owner
Group
Others
Permissions are represented as read (r), write (w), and execute (x). Adjusting permissions ensures secure access to files and directories.
Advanced Linux Skills
1. Shell Scripting
Shell scripting automates repetitive tasks and enhances efficiency. Using bash scripts, users can create programs to execute commands in sequence.
Example: A Simple Bash Script
bash
Copy code
#!/bin/bash
echo "Hello, World!"
2. System Administration
System administrators use Linux for tasks like:
Managing users and groups.
Monitoring system performance.
Configuring firewalls using tools like iptables.
Scheduling tasks with cron jobs.
3. Package Management
Each Linux distribution uses a package manager to install, update, and remove software:
APT (Ubuntu/Debian): sudo apt install package_name
YUM (CentOS/Fedora): sudo yum install package_name
Zypper (openSUSE): sudo zypper install package_name
Linux for Developers
Linux provides a robust environment for coding and development. Key features include:
Integrated Development Environments (IDEs): Tools like Eclipse, IntelliJ IDEA, and Visual Studio Code are supported.
Version Control Systems: Git integration makes Linux ideal for collaborative software development.
Containerization and Virtualization: Tools like Docker and Kubernetes thrive in Linux environments.
Troubleshooting and Debugging
Learning to troubleshoot is vital for any Linux user. Common methods include:
Viewing Logs: Logs in /var/log offer insights into system errors.
Using Debugging Tools: Commands like strace and gdb help debug applications.
Network Diagnostics: Tools like ping, traceroute, and netstat diagnose connectivity issues.
Linux Certifications
Earning a Linux certification validates your skills and enhances your career prospects. Notable certifications include:
CompTIA Linux+
Red Hat Certified Engineer (RHCE)
Linux Professional Institute Certification (LPIC)
Certified Kubernetes Administrator (CKA)
These certifications demonstrate proficiency in Linux administration, security, and deployment.
Tips for Success in Linux Mastery
Practice Regularly: Familiarity with commands and tools comes through consistent practice.
Join Communities: Engage with Linux forums, such as Stack Overflow and Reddit, to learn from experienced users.
Contribute to Open-Source Projects: Hands-on involvement in projects deepens your understanding of Linux and enhances your resume.
Stay Updated: Follow Linux news and updates to stay informed about advancements and changes.
Conclusion
Mastering Linux is a transformative journey that equips individuals and organizations with the tools to thrive in a technology-driven world. By following the steps outlined in this guide, you can progress from a Linux novice to a seasoned expert, ready to tackle real-world challenges and opportunities.
0 notes
Text
Fix Laravel Security Misconfigurations: Tools & Examples
Understanding Security Misconfigurations in Laravel
Security misconfigurations are one of the most common vulnerabilities affecting Laravel applications. They occur when systems, frameworks, or application settings are improperly configured, exposing your website to potential threats.

Laravel’s flexibility is one of its strengths, but default settings or improper configurations can leave your application open to attacks. This blog post will walk you through common security misconfigurations in Laravel, show you how to fix them with examples and introduce tools to automate vulnerability checks.
What is Security Misconfiguration?
Security misconfiguration happens when:
Default settings are not updated (e.g., default passwords or unnecessary features).
Error messages expose sensitive information.
Permissions and access controls are improperly configured.
For instance, a Laravel app with debug mode enabled in production can reveal sensitive information about your application’s structure, giving attackers insights into potential vulnerabilities.
Common Laravel Misconfigurations
Debug Mode Enabled Debug mode (APP_DEBUG=true) in production environments can expose database credentials, file paths, and other sensitive information. Fix: Update the .env file to disable debug mode in production: env APP_DEBUG=false Improper Directory Permissions Laravel requires writable permissions for certain directories, but granting overly permissive access can lead to security issues. Fix: Use restrictive permissions: bash chmod -R 755 storage chmod -R 755 bootstrap/cache
Unsecured API Endpoints Exposed API endpoints can lead to unauthorized access or data leakage if not properly secured. Fix: Implement proper authentication and authorization checks using Laravel's middleware: php Route::middleware('auth:api')->group(function () { Route::get('/user', function (Request $request) { return $request->user(); }); });
How to Detect Security Misconfigurations Easily
To make vulnerability detection easier, use our tool to test website security free. This tool scans your Laravel application for potential misconfigurations and other vulnerabilities in seconds.
Sample Screenshot: Below is an example of the tool’s interface showing detected issues in a Laravel application.

Example: Fixing an API Misconfiguration in Laravel
Let’s say your Laravel application exposes sensitive information via an unprotected API endpoint.
Before Fixing:
php Route::get('/data', function () { return DB::table('users')->get(); });
After Fixing:
php Route::middleware('auth:api')->get('/data', function () { return DB::table('users')->get(); });
This ensures only authorized users can access sensitive data.
Report Your Vulnerability Fixes
After addressing misconfigurations, use our Website Security Checker to generate a vulnerability assessment report. This report confirms the security status of your Laravel application.
Sample Screenshot: Below is a sample report showing vulnerabilities detected and fixed using our free tool.

Final Tips to Secure Your Laravel Application
Regularly update your Laravel framework and packages.
Disable unused features, such as unused routes and services.
Use environment-specific configurations.
For a deeper dive into protecting your Laravel app, check out our free tool and follow best practices for secure coding.
Conclusion
Security misconfigurations can be costly, but with proper practices and tools like our Free Website Security Scanner, you can detect and fix issues quickly. Safeguard your Laravel application today and avoid unnecessary risks.
0 notes
Text
Bought a Raspberry Pi kit recently and imagined what to do next? Well, don't worry; here in this article, I will let you how to program a Raspberry Pi. If you are excited about your Raspberry Pi but have not written a single line of code before, don't worry. Programming a Raspberry Pi is a piece of cake. It's easy, simple, and interesting to code this tiny yet powerful supercomputer. Programming Languages Programming, languages like C, C++, Java, Scratch, Ruby, Python all come preinstalled in the Raspberry Pi editor. Raspberry Pi Foundation recommends Python language for all the new Pi learners. Also, the “Pi” in the name “Raspberry Pi” implies Python in it. For younger kids, Scratch is the recommended language to learn. Any language which is compatible with ARMv6 is supported in Raspberry Pi. You are not restricted to use Python. Other languages supported in Raspberry Pi HTML Perl Javascript JQuery How to write a program in C? C is the preferred language when you are just entering the programming world. It is the best language to clear your logical concepts. Now, why am I talking about all this? Well, you will need a strong logical ability to write gobsmacking programs. If your core foundation is not strong, it's difficult to write proper and clean code. Writing your first program This is a simple program to print "Hello World" on your screen. Pretty simple, isn't it? Compiling a program Compiling the program helps computer change the program written in a human readable form to machine readable format. For compiling a C program on Windows open "Command Prompt." After opening Cmd. Write the following command. Example: gcc helloworld.c -o mycprogram. When you compile the source file, it will be changed with the new name you give. Here we will take it as mycprogram. Here helloworld.c is your program file name. Making the program executable For making the program executable just change the file permissions, and you are good to go. Copy and paste the following command in your cmd. chmod +x mycprogram Executing the program For executing the program write the following command in your Cmd. ./mycprogram This is all you need to do to execute your first C program. How to write a program in Python? Python is widely used when it comes to programming languages. Python programs are concise and easy to execute. Features of Python Interpreted Language. Object-oriented. Beginner's Language. Writing your program in Python print "Hello, World!" Just a single line of code will let you print “Hello World” on your computer screen. That's the power of Python Language. Running a Python Program Simply open cmd and write the following command. Make sure you are in the folder directory where you stored your program. python helloworld.py Making the program executable You can make a file executable by entering this at the command prompt chmod +x file-name.py Executing the program For executing the program write the following command in your Cmd. ./file-name.py This is all you need to do to execute your first Python program. How to write a program in HTML? HTML is the most used language in programming when it comes to the User Interface (UI). HTML is very simple to code and requires no logical abilities. Just a creative mind to code and you will master HTML pretty soon. There are many other languages like Javascript, Bootstrap, and JQuery to make your pages more attractive and user-friendly but, it all starts with the HTML code. Writing your program in HTML This is how simple it is to write a HTML code. If you try executing this code you can see “Hello world” message right to your screen. Applying CSS With CSS you can create beautiful and attractive pages. CSS is a framework for styling your HTML pages. Here is the demo how to code in CSS Now, it’s time to apply this code to your Pi you need to install Apache. Make sure your Raspberry Pi is connected to the Internet and in working condition. Write following commands: sudo apt-get update
sudo apt-get upgrade sudo apt-get install apache2 sudo apt-get install apache2 Copy all your HTML and CSS code and save it in /var/www/index.html. You can open this file writing the following command in your terminal: sudo leafpad /var/www/index.html Your program will not execute unless you give permissions to read for other users. You can do this by writing the following command. sudo chmod a+r /var/www/index.html Type ifconfig in command prompt to find your Pi's IP address. Note down your Ip address. Paste this Ip address in your browser and see how your code works. With the combo of HTML, CSS, and Python you can create wonders in Raspberry Pi. Wrap up As you can see programming is not a difficult job to do. It requires a little interest and skills. I hope you found this article useful and you learned something new today by reading this article. Try experimenting with your programming skills and make something which is truly amazing. Let me know in the comments section which language you will prefer as your primary language to code in Raspberry Pi. My name is Mandip and I run raspberry pi starter kits. I love to tinker with the electronics circuits and create new and useful designs. Sometimes the results come awful, too! I share all my ideas, research, and knowledge on my website. I also love to travel and explore historical places whenever I get suitable time for it.
0 notes
Text
Linux CLI 18 🐧 id, chmod and umask commands
New Post has been published on https://tuts.kandz.me/linux-cli-18-%f0%9f%90%a7-id-chmod-and-umask-commands/
Linux CLI 18 🐧 id, chmod and umask commands

youtube
id is used to display information about a user getting information for the current user getting information for specific user getting the user ID for specific user getting the group ID for specific user getting the name for a specific user getting all groups for a specific user chmod changes the permissions of a file or a directory only the owner or the superuser is allowed to do that youcan change the permissions with 2 ways 1 → by symbolic representation symbolic representation example 2 → by octal number representation octal number representation example chmod symbolic representations explanation u → owner g → group o → others → add permission - → remove permission = → set permissions r → readable w → writable x → executable s → set user id S → set group id u+rwx → add to the owner read, write and execute permissions g-wx → removes from the group write and execute permissions o=rx → set for the others read and execute permissions chmod octal number representation there are 3 digits, like 644 1st → for the owner(u) 2nd → for the group(g) 3rd → for the other(o) 0 → no permissions(---) 1 → execute permission(--x) 2 → write permission(-w-) 3 → write and execute permissions(-wx) 4 → read permission(r--) 5 → read and execute permissions(r-x) 6 → read and write permissions(rw-) 7 → read, write and execute permissions(rwx) sets 640 → read and execute for the owner, read permissions for the group and no permissions for the rest umask determines the default permissions applied to new files/directories gets the current default permission chaging to 0000, no file or directory will have any restrictive permissions by default changing back to 0022 to understand the new permission just subtract files 666-022 = 644 directories 777-022=755 echo "umask new_mask" →→ ~/.bashrc → adds a new mask to .bashrc and you it will be permanent
0 notes
Text
How to deploying Laravel projects on a live server – Complete Step-by-Step Guide
Learn How to deploying Laravel projects on a live server with this comprehensive guide. Step-by-step instructions on setting up hosting, configuring files, and deploying your Laravel app smoothly.Read Laravel Docs
How to deploying Laravel projects on a live server, you’ll need to follow a structured process. Here’s a step-by-step guide to help you:

1. Purchase Domain and Hosting
Make sure you have a domain and a hosting plan. Most shared hosting plans (like cPanel-based ones) or a VPS will work for Laravel, but ensure your server supports PHP and MySQL and meets Laravel’s requirements (PHP version, required extensions, etc.).
2. Prepare Your Laravel Project
Make sure your Laravel project is working locally.
Run the following command to clear any cached configuration and to optimize the project:
php artisan cache:clear
php artisan config:clear
php artisan route:clear
php artisan view:clear
Set up your environment variables (.env file). Make sure they are correctly configured for the live server (e.g., database, mail, and app URL settings).
3. Zip and Upload Your Laravel Project
Compress your entire Laravel project folder (without the node_modules and vendor directories) into a .zip file.
Use FTP (with FileZilla or any other FTP client) or File Manager in cPanel to upload the .zip file to your server. Typically, upload the file to the public_html or a subdirectory within it if you want to run your Laravel app in a subdirectory.
4. Extract the Files
Once uploaded, use File Manager in your hosting control panel to extract the .zip file.
5. Set Up the Public Directory
By default, Laravel’s entry point is the public folder, which contains the index.php file. On a shared hosting server:
Move everything in the public folder (including the .htaccess and index.php files) to the root directory (usually public_html).
Edit the index.php file to update the paths:
Change:
require __DIR__.'/../vendor/autoload.php';
$app = require_once __DIR__.'/../bootstrap/app.php';
To:
require __DIR__.'/vendor/autoload.php';
$app = require_once __DIR__.'/bootstrap/app.php';
This ensures that Laravel can find the necessary files in the correct directory.
6. Set File Permissions
Ensure that the following directories are writable by the server:
/storage
/bootstrap/cache
Use the following command via SSH (if available) or through the hosting file manager:chmod -R 775 storage chmod -R 775 bootstrap/cache
7. Set Up a Database
Create a MySQL database and a user with privileges in cPanel (or via SSH if using VPS).
Update the .env file with your database credentials:
DB_HOST=localhost DB_DATABASE=your_database_name DB_USERNAME=your_database_username DB_PASSWORD=your_database_password
8. Install Composer Dependencies
If you have SSH access:
SSH into your server using a terminal or a tool like PuTTY.
Navigate to your project directory
cd /path/to/your/project
Run Composer to install the dependencies:
composer install --optimize-autoloader --no-dev
If you don’t have SSH access, you can run composer install locally, zip the vendor folder, and upload it to the server.
9. Run Migrations
If you have SSH access, run the following command to migrate the database:
php artisan migrate --force
If you don’t have SSH access, you can run the migrations locally and then export/import the database to the server via phpMyAdmin.
10. Set App Key
Generate a new application key if you haven’t already:php artisan key:generate
Ensure the key is set in the .env file:
Read Full Tutorials
0 notes
Text

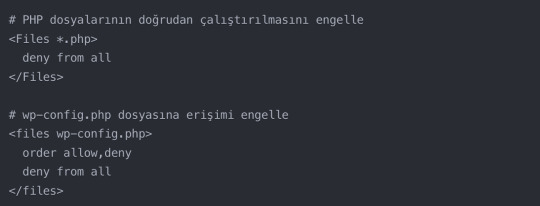
WordPress Dosya İzinleri (CHMOD) Nasıl Olmalı?
WordPress, dünya genelinde milyonlarca web sitesi için tercih edilen bir içerik yönetim sistemidir. Ancak, her popüler platform gibi, güvenlik de büyük bir önem taşır. Sitenizin güvenliği ve performansı, sadece güçlü bir şifre ve güncel eklentilerle sınırlı değil. Dosya izinleri de bu konuda kritik bir rol oynuyor. Bu yazıda, WordPress sitenizin güvenliğini artırmada kritik bir rol oynayan dosya izinlerinin (CHMOD) nasıl ayarlanması gerektiğini detaylıca ele alacağız.
WordPress Dosya İzinleri Nedir?
CHMOD, UNIX ve Linux tabanlı sistemlerde dosya izinlerini değiştirmek için kullanılan bir komuttur.. Bu izinler, dosya ve klasörlere kimlerin okuma, yazma veya çalıştırma yetkisi olduğunu belirler. WordPress bağlamında, doğru izinlerin ayarlanması, sitenizin güvenliğini önemli ölçüde etkiler. Düşünün ki evinizde bazı odalara sadece siz girebiliyorsunuz, bazılarına misafirleriniz de girebiliyor. İşte dosya izinleri de buna benzer bir mantıkla çalışır.
CHMOD Nedir ve Nasıl Çalışır?
CHMOD, “Change Mode” kelimelerinin kısaltmasıdır. Bu sistem, üç farklı kullanıcı tipine (dosya sahibi, grup ve diğerleri) üç farklı izin tipi (okuma, yazma ve çalıştırma) atar.
Bu izinler genellikle üç basamaklı sayılarla ifade edilir:
4: Okuma izni
2: Yazma izni
1: Çalıştırma izni
Bu sayıları toplayarak farklı izin kombinasyonları oluşturabilirsiniz. Örneğin, 644 izni şu anlama gelir:
Dosya sahibi: Okuma ve yazma (4+2=6)
Grup: Sadece okuma (4)
Diğerleri: Sadece okuma (4)
Doğru Dosya İzinleri Neden Önemli?
Doğru ayarlanmış dosya izinleri, sitenizin güvenliğini artırır, yetkisiz erişimleri engeller sitenizin ve bütünlüğünü korumak için hayati önem taşır. Aynı zamanda, WordPress’in düzgün çalışması için de kritik öneme sahiptir. Yanlış izinler, güvenlik açıklarına, kötü niyetli kişilere zararlı kod eklemelerine veya verileri sızdırmalarına, hatta sitenizin çökmesine neden olabilir.
WordPress’te Temel Dosya İzinleri
WordPress’in sorunsuz çalışması için bazı temel dosya ve klasörlerin doğru izinlere sahip olması gerekir. İşte en önemli olanları:
wp-config.php Dosyası İzinleri
wp-config.php dosyası, WordPress kurulumunuzun kalbidir. Veritabanı bilgileri gibi hassas verileri içerdiğinden, bu dosyanın izinlerinin sıkı tutulması gerekir. Genellikle önerilen izin 600 veya 640’tır.
wp-content Klasörü İzinleri
wp-content klasörü, temalarınızı, eklentilerinizi ve yüklenmiş medya dosyalarınızı içerir. Bu klasörün izinleri genellikle 755 olarak ayarlanır, böylece WordPress bu klasöre yazabilir ama diğer kullanıcılar sadece okuyabilir.
Tema ve Eklenti Dosyaları İzinleri
Tema ve eklenti dosyaları genellikle 644 izinlerine sahip olmalıdır. Bu, WordPress’in bu dosyaları okumasına izin verir ancak yazma iznini kısıtlar.
Dosya İzinlerini Kontrol Etme ve Değiştirme Yöntemleri
Dosya izinlerini kontrol etmek ve değiştirmek için birkaç yöntem var. İşte en yaygın olanları:
FTP Üzerinden Dosya İzinlerini Yönetme
FTP istemcinizi kullanarak sunucunuza bağlanabilir ve dosya izinlerini görüntüleyip değiştirebilirsiniz. Çoğu FTP istemcisi, dosyaya sağ tıklayıp “İzinler” veya “CHMOD” seçeneğini seçmenize olanak tanır.
cPanel File Manager ile İzin Değiştirme
Web hosting kontrol panelinizde bulunan File Manager aracını kullanarak da dosya izinlerini değiştirebilirsiniz. Dosyayı seçin, “Change Permissions” butonuna tıklayın ve istediğiniz izinleri ayarlayın.
SSH Kullanarak Dosya İzinlerini Ayarlama
Eğer sunucunuza SSH erişiminiz varsa, komut satırını kullanarak izinleri değiştirebilirsiniz.
Örneğin: chmod 644 dosya_adi.php
Güvenli WordPress Dosya İzinleri İçin En İyi Uygulamalar
WordPress sitenizi güvende tutmak için bazı best practice’leri uygulayabilirsiniz:
Hassas Dosyaların Korunması
wp-config.php gibi hassas dosyaların izinlerini sıkı tutun. Bu dosyaları 600 veya 640 izinleriyle koruyun.
Düzenli İzin Kontrolleri
Sitenizin dosya izinlerini düzenli olarak kontrol edin. Özellikle güncellemelerden veya yeni eklenti/tema yüklemelerinden sonra bu kontrolü yapmayı unutmayın.
Otomatik Güncelleme Ayarları ve İzinler
WordPress’in otomatik güncellemeler yapabilmesi için bazı dosya ve klasörlerin yazılabilir olması gerekir. Ancak bu, güvenlik riskleri oluşturabilir. Otomatik güncellemeleri dikkatli kullanın ve güncelleme sonrası izinleri tekrar kontrol edin.
Dosya İzinleri ile İlgili Yaygın Sorunlar ve Çözümleri
Bazen dosya izinleri sorunları, can sıkıcı hatalara neden olabilir. İşte en yaygın sorunlar ve çözümleri:
500 Internal Server Error
Bu hata genellikle .htaccess dosyasının izinleriyle ilgilidir. .htaccess dosyasının izinlerini 644 olarak ayarlamayı deneyin.
Beyaz Ekran Hatası (WSOD)
WSOD genellikle PHP hatalarından kaynaklanır. wp-content klasörünün ve alt klasörlerinin izinlerini kontrol edin ve 755 olarak ayarlayın.
Eklenti ve Tema Yükleme Sorunları
Eğer eklenti veya tema yükleyemiyorsanız, wp-content/plugins ve wp-content/themes klasörlerinin izinlerini kontrol edin. Bu klasörler 755 izinlerine sahip olmalıdır.
İleri Seviye WordPress Dosya İzini Yönetimi
WordPress’in temel dosya izinlerini anlamak önemlidir, ancak bazı durumlar daha ileri düzey bir yaklaşım gerektirir. İşte derinlemesine bakmanız gereken bazı alanlar:
.htaccess Dosyası İzinleri ve Özelleştirmeleri
.htaccess dosyası, WordPress sitenizin davranışını kontrol eden güçlü bir araçtır. Bu dosyanın izinleri ve içeriği, sitenizin güvenliği ve performansı üzerinde büyük bir etkiye sahip olabilir.
H3: Özel İçerik Türleri için İzin Ayarları
WordPress’te özel içerik türleri oluşturduğunuzda, bu içeriklerin nasıl depolandığını ve erişildiğini dikkatle yönetmeniz gerekir.
Özel Klasörler: Özel içerik türleri için ayrı klasörler oluşturduysanız (örneğin, wp-content/custom-post-types/), bu klasörlerin izinlerini 755 olarak ayarlayın. Bu, WordPress’in içerikleri okumasına ve yazmasına izin verirken, diğer kullanıcıların sadece okumasına izin verir.
Özel Dosya Türleri: Özel içerik türleriniz özel dosya türleri içeriyorsa (örneğin, .pdf veya .docx), bu dosyaların izinlerini 644 olarak ayarlayın. Bu, dosyaların okunabilir olmasını sağlarken, yetkisiz değişiklikleri önler.
Dinamik İçerik Yönetimi: Eğer özel içerik türleriniz dinamik olarak oluşturulan dosyalar içeriyorsa (örneğin, kullanıcı tarafından yüklenen dosyalar), bu dosyaların güvenli bir şekilde depolanmasını ve erişilmesini sağlamanız gerekir:

H3: Cron İşleri ve Zamanlanmış Görevler için İzin Yönetimi
WordPress’in zamanlanmış görevleri ve özel cron işleri, özel izin ayarları gerektirebilir.
wp-cron.php İzinleri: wp-cron.php dosyasının izinlerini 644 olarak ayarlayın. Bu, dosyanın okunabilir olmasını sağlar ancak yetkisiz değişiklikleri önler.
Özel Cron Betikleri: Özel cron betikleri oluşturduysanız, bu betiklerin izinlerini 644 olarak ayarlayın ve güvenli bir konumda (örneğin, public_html dizininin dışında) saklayın.
Cron Logları: Cron işleriniz için log dosyaları oluşturuyorsanız, bu dosyaların izinlerini 664 olarak ayarlayın. Bu, WordPress’in dosyaya yazmasına izin verirken, diğer kullanıcıların sadece okumasına izin verir.
H3: Çoklu Site (Multisite) Kurulumları için İzin Yönetimi
WordPress Multisite kurulumları, daha karmaşık bir izin yapısı gerektirir:
Uploads Klasörü: Multisite kurulumlarında, her alt sitenin kendi uploads klasörü olur. Bu klasörlerin izinlerini 755 olarak ayarlayın.
Alt Site Klasörleri: Her alt sitenin kök klasörünün (örneğin, /wp-content/blogs.dir/2/) izinlerini 755 olarak ayarlayın.
Ağ Yöneticisi Dosyaları: wp-admin/network/ klasöründeki dosyaların izinlerini 644 olarak ayarlayın, bu klasörün kendisini ise 755 yapın.
Bu ileri düzey izin yönetimi teknikleri, WordPress sitenizin güvenliğini ve performansını önemli ölçüde artırabilir. Ancak, bu değişiklikleri yaparken dikkatli olun ve her zaman bir yedek alın.
Dosya izinleri konusunda herhangi bir şüpheniz varsa veya WordPress sitenizin güvenliğini profesyonel bir şekilde yönetmek istiyorsanız, uzman desteği almak en doğru seçenek olabilir. Gezgin Ajans olarak, WordPress güvenliği konusunda kapsamlı hizmetler sunuyoruz. WordPress Güvenlik Hizmetimiz hakkında detaylı bilgi almak ve sitenizi nasıl daha güvenli hale getirebileceğinizi öğrenmek için WordPress uzmanlarımızla iletişime geçebilirsiniz. Uzmanlarımız, sizin özel ihtiyaçlarınıza uygun çözümler sunarak, sitenizin güvenliğini en üst düzeye çıkarmanıza yardımcı olacaktır.
Sonuç
WordPress dosya izinleri, sitenizin güvenliği ve performansı için kritik öneme sahiptir. Doğru izinler, sitenizi korurken aynı zamanda sorunsuz çalışmasını sağlar. Düzenli kontroller yaparak ve best practice’leri uygulayarak, WordPress sitenizi daha güvenli ve stabil hale getirebilirsiniz.
Sıkça Sorulan Sorular (SSS)
Dosya izinlerini değiştirmek tehlikeli mi? Doğru yapıldığında tehlikeli değildir. Ancak yanlış izinler sitenizin çalışmamasına veya güvenlik açıklarına neden olabilir. Değişiklik yapmadan önce mutlaka yedek alın.
WordPress’in önerdiği standart dosya izinleri nelerdir? Genellikle, dosyalar için 644, klasörler için 755 önerilir. Ancak wp-config.php gibi hassas dosyalar için daha sıkı izinler (600 veya 640) gerekebilir.
Dosya izinlerimi nasıl kontrol edebilirim? FTP istemciniz, cPanel File Manager veya SSH kullanarak dosya izinlerini kontrol edebilirsiniz.
777 izinleri neden tehlikeli? 777 izinleri, herkesin dosyayı okuma, yazma ve çalıştırma iznine sahip olduğu anlamına gelir. Bu, potansiyel saldırganların dosyalarınızı değiştirmesine olanak tanır.
Dosya izinleri sorunları nasıl tespit edilir? Genellikle, WordPress hataları veya beyaz ekran sorunları dosya izinleriyle ilgili olabilir. Ayrıca, WordPress güvenlik eklentileri de izin sorunlarını tespit etmenize yardımcı olabilir.
wp-config.php dosyasının izinleri neden önemli? wp-config.php, veritabanı bilgileri gibi hassas bilgiler içerir. Bu nedenle, bu dosyanın izinlerinin sıkı tutulması güvenlik açısından kritiktir.
Dosya izinlerini değiştirdikten sonra sitemi test etmeli miyim? Evet, herhangi bir değişiklikten sonra sitenizi test etmek önemlidir. Tüm sayfaların ve özelliklerin düzgün çalıştığından emin olun.
Eklenti ve tema güncellemeleri dosya izinlerini etkiler mi? Bazen etkileyebilir. Bu nedenle, güncellemelerden sonra kritik dosya ve klasörlerin izinlerini kontrol etmek iyi bir uygulamadır.
Dosya izinleri sorunları hosting sağlayıcımdan kaynaklanabilir mi? Evet, bazı hosting sağlayıcıları güvenlik nedeniyle belirli dosya izinlerini kısıtlayabilir. Sorun yaşıyorsanız hosting sağlayıcınızla iletişime geçin.
Dosya izinlerini otomatik olarak yönetmek mümkün mü? Bazı WordPress güvenlik eklentileri, dosya izinlerini otomatik olarak yönetebilir. Ancak manuel kontrol her zaman daha güvenlidir.
0 notes
Text
Automating RHEL Tasks with Shell Scripting
Introduction
Red Hat Enterprise Linux (RHEL) is a powerful and versatile operating system used widely in enterprise environments. One of its greatest strengths lies in the ability to automate repetitive tasks using shell scripting. This article will cover the basics of shell scripting, how to write and execute scripts, common use cases for automation, and tips for creating efficient scripts.
Basics of Shell Scripting
Shell scripting allows you to automate commands that you would normally run in a terminal. The most common shell used in RHEL is Bash (Bourne Again Shell).
1. Creating a Shell Script
To create a shell script, start by creating a new file with a .sh extension:
nano myscript.sh
2. Writing the Script
Begin your script with the shebang (#!) followed by the path to the shell interpreter:
#!/bin/bash
echo "Hello, RHEL!"
3. Making the Script Executable
Before you can run your script, you need to make it executable:
chmod +x myscript.sh
4. Executing the Script
You can run your script by typing:
./myscript.sh
Common Use Cases for Automation
1. System Monitoring
Automate system monitoring tasks to keep an eye on resource usage, disk space, and running processes.
#!/bin/bash
# Check disk space
df -h
# Check memory usage
free -m
2. Backup and Restore
Automate backup processes to ensure your data is safely stored and easily retrievable.
#!/bin/bash
# Backup important files
tar -czvf backup.tar.gz /path/to/important/files
3. User Management
Automate the creation and deletion of users, as well as setting permissions.
#!/bin/bash
# Add a new user
useradd newuser
# Set a password for the user
echo "newuser:password" | chpasswd
4. Software Installation and Updates
Automate the installation and updating of software packages.
#!/bin/bash
# Update all packages
yum update -y
# Install a specific package
yum install -y httpd
Tips for Creating Efficient Scripts
Use Comments: Comment your code to explain what each part of the script does. This makes it easier to understand and maintain.
# This script checks disk space and memory usage
df -h
free -m
2. Error Handling: Implement error handling to make your scripts more robust.
if [ $? -ne 0 ]; then
echo "An error occurred"
exit 1
fi
3. Variables: Use variables to store values that are used multiple times in your script.
# Define variables
BACKUP_DIR="/path/to/backup"
tar -czvf $BACKUP_DIR/backup.tar.gz /path/to/important/files
4. Loops: Use loops to perform repetitive tasks efficiently.
# Loop through a list of directories and create backups
for DIR in /home /var/log /etc; do
tar -czvf $DIR-backup.tar.gz $DIR
done
5. Functions: Use functions to organize your code into reusable blocks.
# Define a function
check_disk_space() {
df -h
}
# Call the function
check_disk_space
Conclusion
Shell scripting is a powerful tool for automating tasks in RHEL, making it easier to manage systems and perform routine tasks efficiently. By understanding the basics, common use cases, and best practices, you can harness the full potential of shell scripting to streamline your workflows and improve productivity.
For more details www.hawkstack.com
#redhatcourses#docker#linux#container#information technology#containerorchestration#kubernetes#containersecurity#dockerswarm#aws#hawkstack
0 notes